How to Send Individual Marketing Cloud Journey Builder Email Results to a Sales Cloud Lead Record
A few years ago, I was tasked with transitioning our email marketing platform to Salesforce Marketing Cloud.
For me, the toughest part about setting up Marketing Cloud was tracking emails from Journey Builder. After many Google and StackExchange searches and documentation from 2010, it was difficult to find clear, step-by-step directions. One of the Salesforce Analysts on my team and I scheduled an Accelerator, a one-on-one coaching session with a Salesforce expert and even he had to hang up and get back to us the next day on one of the steps.
I’m guessing I’m not the only one who became obsessed with making this idea that seems so simple a reality. And please tell me I’m not the only one who has had nightmares about Marketing Cloud.
So here’s how I finally made it work. Let me know if it works for you, or if this setup is completely hacky.
Before You Start
Make sure you have the latest version of Marketing Cloud Connector set up on the Sales Cloud side
Ask your Sales Cloud Administrator to add the object to view Individual Email Results on Lead Records
Data Extensions Setup
Yes, extensions. Plural.
In Email Studio, create a new Data Extension in the regular Salesforce Data Extensions folder with all of the same fields as your Synchronized Data Extension
Create a Data Filter based on the Data Extension you created in Step 1 to set the field values you want to require for a contact to enter your Journey
Hop Over to Automation Studio
In Automation Studio, create an automation saved under the Journey Builder folder
In your new Automation, under Activities select SQL Query for your first step of the workflow
Use the query
select * from Lead_SalesforceTarget the data extension you created in Step 1
Select Data Action: Update matching data, if found. If a record is not found, a new one is added.
Create a new filter activity using the data filter you created in Step 2 for the Filter Definition
This will create an additional DE with the name of your filter activity in the SF data extensions. I have no idea why. It will show your last refresh date but won’t have any records in it. Move this filter activity Data Extension with 0 records in it somewhere under the Data Extensions folder.
This and the next step are what allows Salesforce to sync the email send, open, and click data to the Salesforce lead record
Next up: Contact Builder
In Contact Builder, select the attribute group that houses your Synchronized Data Extensions and link your filtered activity (that one with 0 records in it) to the appropriate Synchronized Data Extension Data Extensions (in my case Lead_Salesforce)
Finally, Journey Builder
Start with an Entry Source: Data Extension
Select the Filter DE with zero records that was created in 3b
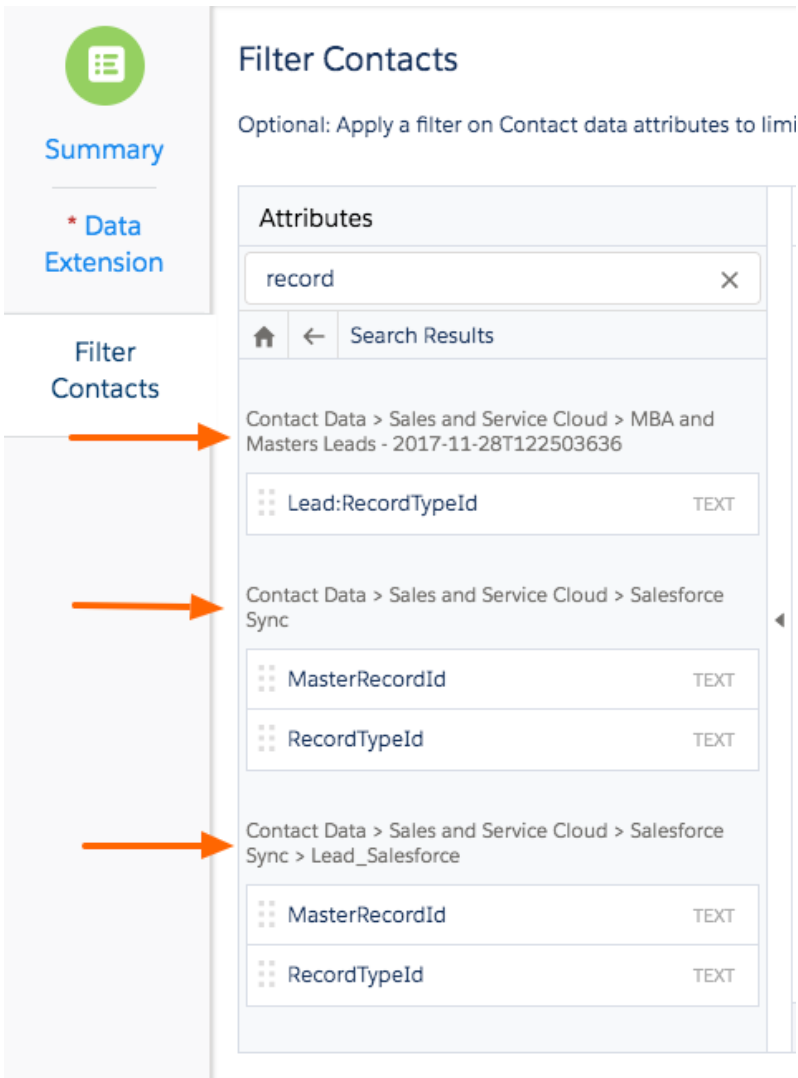
Filter your contacts using the Sales and Service Cloud contact data > Salesforce Sync > Lead_Salesforce fields
If you search for fields, pay attention to which path or Data Extension you are pulling your fields from. If you get the following notification warning, your paths to the data extension you want to use don’t match.
Marketing Cloud Journey Builder Alert: At least one attribute in this filter criteria could produce multiple matching values. By default, Journey Builder uses the first matching value. You can use attribute-to-attribute comparison to determine the right match. Tell Me More.
You did it!
From there, build out a journey to test. You should be able to see the emails sent through Journey Builder under an individual’s Lead Record under Individual Email Sends.
Limitations
The quickest an Automation can be scheduled to refresh is hourly, so Journeys are best for lead nurture campaigns. They should not be used for triggered sends that need to be sent immediately after a user takes action.